Hello everyone, happy November! I've got something really fun to share with you today.
Have you ever found a quilt pattern that you absolutely love and once you finish your top you wish it was just a LITTLE bit bigger? Well, you're in luck! This guest blog post by the amazing Lindsey Bills of The Quilting Corner will walk you through exactly how to do this in the cutest, scrappiest way.
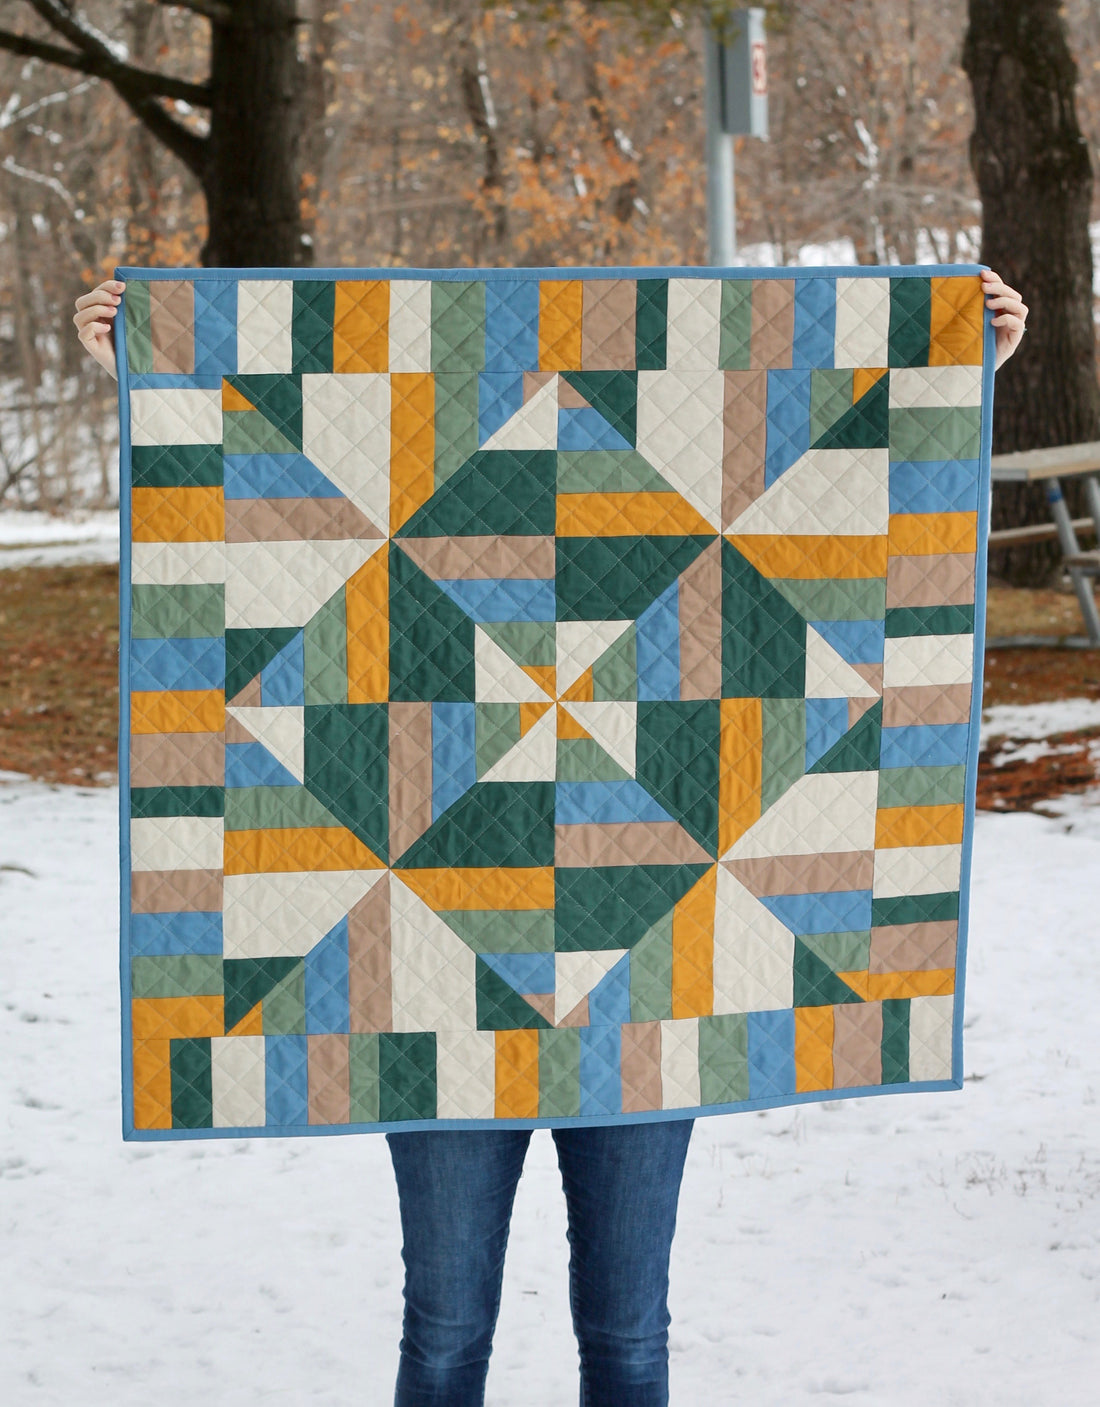
Lindsey and I met last year when I was getting ready to release my first quilt pattern, Pippilotta (seen in the Baby size, below). I asked her if she'd be interested in testing, we clicked instantly, and she has been testing for me (and being my sounding board) ever since.
Lindsey is not only an incredible quilter, she's also got the cutest Etsy shop with some fun stickers and beautiful handmade stockings and doll pillow/quilt sets. And the best part? She is also a wonderful fellow mama and friend.
Read on to see what she has to say.
HOW TO MAKE A SCRAPPY BORDER
One of the quickest and easiest ways to increase the dimensions of a quilt is to add a border. I’ve found that this border adds a touch of spunk when I’d like a quilt to be slightly larger but I don’t feel like fiddling with the measurements in a pattern. I hope that you find this border to be as quick, scrap-friendly, and fun as I have.

GETTING STARTED
Before moving forward, first you must decide how wide you would like your border to be. I have found that anywhere between 4” and 7” works best for smaller quilts, whereas 6”-10” suits throw-size and larger. This is entirely up to your preference. For the sake of this tutorial, I will reference a 5” width of border for my examples.
As you piece your border, you will be essentially creating four long strips of fabric that will frame your quilt. The following chart may be referenced to determine the minimum length of pieced border required.
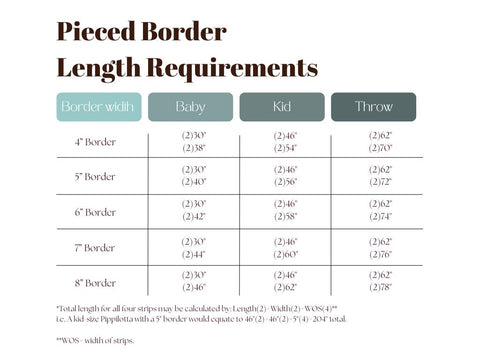
Note: This number reflects the absolute minimum required. As most beginners do not have access to large cutting mats, you may find it helpful to make your border strips longer, then trim them to size after attaching them to the quilt. If you choose to go this route, I would highly suggest piecing an estimated 4” more than the minimum.
You can always lay your strips next to your quilt to get a gauge for whether or not each strip is long enough.
PICKING BORDER FABRICS
Depending on what size of quilt you’ve made for the Pippilotta pattern, you may find that you have sewn leftovers. These pieces are perfect for this border. In order to have enough fabric, you will need to subsidize with other scrap fabrics that you have or with remaining yardage.
If you decide to utilize scraps in your stash, be sure that the scraps you’ve chosen are large enough to work with your chosen border width. For example, where I’ve chosen a 5” border, I would need to be sure that my scraps measure a minimum of 5”x2”.
If you choose to create this border with yardage, the process becomes much quicker and simpler as you can use the same strip-piecing methods discussed in the Pippilotta pattern.

PIECING SCRAPS
Once you have gathered your scrap fabrics, you may begin by orienting your piece vertically and trimming it to the width that you’ve chosen for your border. You may then begin cutting horizontally at any width desired. I have noticed that it’s best to cut anywhere between 1.5” and 6”. For a more uniform look, I like to cut my fabrics between 2” and 4”. For a more varied look, feel free to use up that entire 1.5” through 6” range.

Tip: Once you are at your machine, sort your scrap pieces into piles by color/values. As you chain-piece, you will find it easier to randomly select two fabrics that contrast with each-other. This ensures that each color is evenly distributed throughout your border.
You may now sew your scraps right-sides facing each other. Be sure that you are sewing along the WOB(width of border) edges. Continue piecing until all of your cut pieces meet the length requirements detailed in the Pieced Border Length Requirement chart.

If you are sewing exclusively with scraps, feel free to skip ahead to the Attaching Your Border section to reach your next step.
PIECING YARDAGE
When using yardage, I’ve found that cutting and sewing WOF(width of fabric) strips is the easiest method.
When cutting your WOF strips, you can be as spontaneous or as calculated as your heart desires. If you are one that prefers to have your strips match the width of those in the Pippilotta pattern, you may want to use the dimensions provided in the cutting directions for strip-piecing in the pattern. However, if you are like me and you prefer a bit of variety, you may cut your strips at any desired width, as long as they are wide enough to accommodate your seam allowance.
Once all of your strip pieces have been cut, begin pairing your strips together in sets of two. Sew these right sides together. Press your seams open or toward the darkest fabric.
Next, you will repeat the process by sewing your strip sets into sets of four. This method will be familiar if you have pieced your Pippilotta already.
At this point, I find it easiest to sub-cut my fabrics into the width that I have chosen for the border. For example, where I am creating a 5” border, I will sub-cut my strip sets at 5”.

You may then take your sets and continue piecing them short sides together. Once you have two strips measuring the width of your quilt and two sets measuring at the width+width of border(2), you are ready to attach your border to your quilt.

ATTACHING BORDER STRIPS
Your strips are complete! The hardest part is over, and now it’s time to attach them to your quilt.

Begin by sewing your two shortest border strips opposite of each other on your quilt.

Once your shortest strips have been attached, square off any overhanging border. Next, attach your two longest border strips to the remaining unfinished edges of your quilt.

Finish off your quilt by squaring off any excess. Congratulations! Your border is now complete. :)

I hope that you’ve found this border to be both scrap efficient and fun to make. With a little tweaking to the math, you’ll find that this border can work on many modern quilts.
ABOUT LINDSEY

Hello!
My name is Lindsey! I began sewing in 2020 but jumped headfirst into quilting in 2021 whilst pregnant with my second baby. Quilting has become more than just a hobby; it has been a space to express new ideas, process complex experiences, make dear friends, and it has permitted me a space of belonging.
Outside of quilting I enjoy mothering my two littles, reading, being outside, spending time with my spouse, listening to music, and exploring the wonderful things happening on ‘Quiltstagram’.
LINDSEY'S ETSY SHOP
Be sure to check out Lindsey's wonderful Etsy shop. Here are just a few of the sweet products she has available.


And be sure to check out these super cute Print-and-Sew Holiday Gift tags! A PDF download with instructions and 14 wonderful templates is available here!


Wasn't this tutorial great?! If you're on Instagram, give Lindsey a follow! She's always making the most beautiful things.